How Hard is It to Install an Irrigation System? Expert Tips Revealed!
Thinking about installing an irrigation system for your garden or lawn? You might be wondering, how hard is it to do it yourself?
The good news is, with the right guidance, you can save money and gain control over your watering schedule. But it’s important to know what challenges you might face before getting started. You’ll discover what the installation process involves, the skills you need, and tips to make it easier.
By the end, you’ll feel confident deciding if this is a project you can handle or if it’s best to call in a pro. Keep reading to find out!
Types Of Irrigation Systems
Installing an irrigation system helps keep plants healthy and green. It saves water and time compared to watering by hand. The difficulty of installation depends on the type of system chosen. Some systems are simple and easy to set up. Others need more tools and skill to install correctly. Understanding the types of irrigation systems makes the process clearer.
Drip Irrigation
Drip irrigation delivers water directly to plant roots. It uses tubes with small holes to drip water slowly. This system reduces water waste and keeps leaves dry. Installing drip irrigation is fairly simple. You need to lay out tubing and connect it to a water source. It works well for gardens and rows of plants.
Sprinkler Systems
Sprinkler systems spray water over a large area. They are common in lawns and big gardens. Installing sprinklers requires digging trenches to lay pipes underground. You must place sprinkler heads in the right spots for good coverage. This system is more complex than drip irrigation but covers more space.
Soaker Hoses
Soaker hoses slowly release water along their length. They are easy to install by just laying them on the ground near plants. No digging is needed, making it a simple and quick option. Soaker hoses work best for flower beds and vegetable gardens.
Surface Irrigation
Surface irrigation lets water flow over the soil surface. It is the oldest irrigation method. You create small channels or furrows for water to move through. This method is low cost but needs careful leveling of land. Installation can be easy or hard depending on the field shape.
Subsurface Irrigation
Subsurface irrigation delivers water below the soil surface. It uses buried pipes or tubes to water roots directly. This system reduces evaporation and saves water. Installing it requires digging trenches and placing tubes underground. It is more difficult and may need professional help.
Tools And Materials Needed
Installing an irrigation system can save time and water. It helps keep plants healthy. The work needs some planning and tools. Knowing what to do makes the job easier. This guide explains the tools and materials needed.
Basic Tools
You need some simple tools to start. Shovel, tape measure, and garden hose are must-haves. A pipe cutter helps cut pipes cleanly. A screwdriver is useful for many parts. Also, a drill makes holes fast. Gloves protect your hands during work.
Materials For The System
The system needs pipes, connectors, and sprinklers. Polyethylene tubing is common for water lines. Use elbows and tees to change pipe direction. Sprinkler heads come in different sizes and types. Choose based on your garden’s needs. Valves control water flow and pressure.
Additional Supplies
Some extra supplies make the job smoother. Teflon tape seals pipe threads to stop leaks. Stakes hold pipes and tubing in place. A backflow preventer protects water from contamination. Marking paint helps plan pipe layout on soil.
Planning Your Layout
Installing an irrigation system can be a good way to keep plants healthy. It saves time and water by watering plants evenly. The difficulty depends on the size of your yard and the type of system you want. Some parts need simple tools, while others may require more skill. Planning is very important for a good result.
Understanding Your Yard
Measure your yard’s size and shape carefully. Note areas that need more water. Look for slopes and shaded spots. These details help decide where to place pipes and sprinklers. Mark flower beds, trees, and lawns on a simple map. This step makes the work easier.
Choosing Sprinkler Types
There are different sprinklers for different needs. Some spray water in a full circle. Others spray only part of a circle. Choose based on the area size and shape. Use drip irrigation for flower beds and shrubs. This saves water and targets roots directly.
Creating A Water Schedule
Decide how often and how long to water plants. Early morning or late evening is best. Avoid watering during the hottest part of the day. This helps reduce water loss from heat. A timer can make this task easy and regular.
Basic Tools Needed
Tool | Purpose |
Shovel | Dig trenches for pipes |
Pipe Cutter | Cut pipes to correct length |
Measuring Tape | Measure distances and pipe lengths |
Sprinkler Heads | Water distribution points |
Timer/Controller | Automate watering schedule |
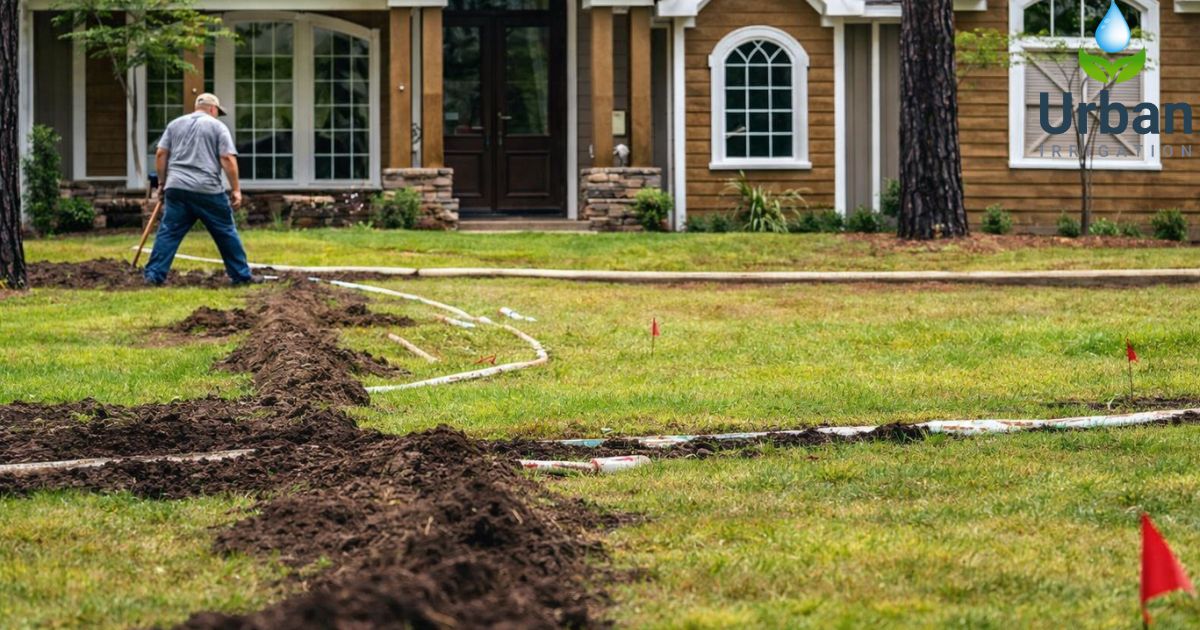
Digging Trenches And Laying Pipes
Installing an irrigation system can seem tough at first. It needs careful planning and work. Many people wonder if they can do it themselves or need help. Understanding the main steps helps a lot. This guide explains one important part: digging trenches and laying pipes.
Digging trenches is the first step in placing irrigation pipes underground. Trenches must be deep enough to protect pipes from damage and weather. Usually, trenches are about 6 to 12 inches deep.
Using the right tools makes digging easier. A trenching shovel or a mechanical trencher works well. Manual digging takes more time but is possible for small areas.
Laying pipes comes after trenches are ready. Pipes should fit tightly and follow the planned path. It is important to check for any sharp bends or kinks in the pipes.
Connecting pipes needs care. Use proper fittings and sealants to avoid leaks. Pipes must slope slightly for good water flow, usually about 1/8 inch per foot.
Step | Details |
Dig Trenches | 6 to 12 inches deep, use shovel or trencher |
Lay Pipes | Place pipes carefully, avoid sharp bends |
Connect Pipes | Use fittings and sealants to prevent leaks |
Check Slope | 1/8 inch drop per foot for water flow |
Installing Sprinklers And Drip Lines
Installing an irrigation system can seem difficult at first. It needs planning and some tools. Knowing the steps helps make the work easier. Sprinklers and drip lines are two common types. Each works differently and fits different gardens. Choosing the right type is important for good watering.
Planning Your Irrigation Layout
Start by measuring your garden space. Draw a simple map to mark where plants grow. Decide which areas need more water. Sprinklers cover wide areas. Drip lines water specific plants. Plan pipe paths to avoid obstacles. This saves time and materials later.
Gather the right tools before starting. Basic tools include:
- Shovel or trenching tool to dig trenches for pipes
- Pipe cutter to cut pipes cleanly
- Hose connectors and fittings to join parts
- Teflon tape to prevent leaks
- Timer to automate watering
Materials depend on your system type. Sprinklers need heads and risers. Drip lines need tubing and emitters.
Installing Sprinklers
Dig shallow trenches where pipes will go. Lay main pipe first. Connect sprinkler heads at planned spots. Make sure heads are level with the ground. This helps water spread evenly. Test the system for leaks before covering trenches.
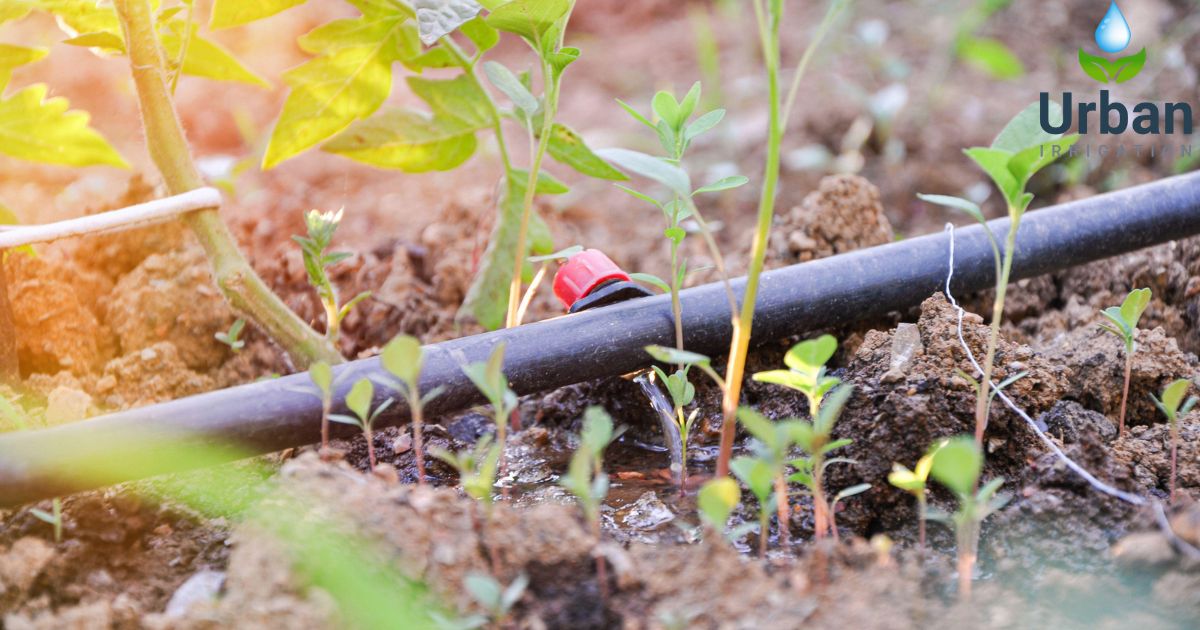
Installing Drip Lines
Lay drip tubing near plant roots. Use emitters to control water flow. Secure tubing with stakes to keep it steady. Check each emitter to ensure water comes out slowly. Drip systems save water by targeting plants directly.
Turn on water supply and watch the system work. Look for dry spots or leaks. Adjust sprinkler heads or emitter placement if needed. Make sure water reaches all plants. Fix any leaks quickly to avoid waste.
Connecting To Water Source
Installing an irrigation system can help keep your garden healthy and green. It may seem difficult at first, but with some planning, the job becomes easier. Knowing the basic steps helps make the process smooth and clear.
Understanding Water Supply Options
The irrigation system needs a steady water supply. Common sources include a garden hose, a water meter, or a rainwater tank. Each source has different connection methods.
A garden hose is the easiest to connect. Water meters require a permit in some areas. Rainwater tanks need a pump to keep pressure steady.
Tools Needed For Connection
- Pipe wrenches to tighten fittings.
- Hose connectors to link hoses and pipes.
- Teflon tape to prevent leaks.
- Shovel to dig trenches if underground pipes are needed.
Steps To Connect To A Water Source
- Turn off the main water supply before starting.
- Attach the backflow preventer to avoid water contamination.
- Connect the irrigation system to the water supply using proper fittings.
- Check all connections for leaks.
- Turn on the water slowly to test the flow.
Testing And Adjusting The System
Testing and adjusting the irrigation system is an important step. It helps to make sure the system works well. Without testing, some parts may not water properly. This can waste water or hurt plants.
Check All Parts For Leaks
Look carefully for leaks at all connections and pipes. Small leaks can cause big water loss. Fix any leaks before moving on.
Run The System Zone By Zone
Turn on one zone at a time. Watch how water comes out of each sprinkler. Check for even coverage so no spots stay dry.
Adjust Sprinkler Heads
Move or change sprinkler heads to cover all areas. Some heads spray far, some spray close. Adjust them to avoid watering streets or sidewalks.
Set The Timer Correctly
Set the timer to water at the best times. Early morning or late evening works well. Use short watering times to save water and avoid runoff.
Make Final Notes
Write down any changes made. This helps for future checks and repairs. Regular testing keeps the system working well for a long time.
Common Challenges And Solutions
Installing an irrigation system can seem difficult at first. There are many steps to follow and tools to use. Understanding common problems helps make the job easier. Knowing some simple solutions can save time and effort.
Planning The Layout
One of the first challenges is planning where to place pipes and sprinklers. The layout must cover all areas needing water. Measure your garden or lawn carefully. Draw a simple map to decide the best spots. Avoid placing sprinklers too close or too far apart.
Choosing The Right Equipment
Picking the correct pipes, valves, and sprinklers is very important. Different plants need different amounts of water. Use materials that fit your budget and climate. PVC pipes are common but can be hard to cut. Flexible tubing is easier but may cost more.
Digging Trenches
Digging trenches for pipes can be tiring and slow. The depth and width must be right to protect pipes. Use a trenching shovel or a mechanical trencher if possible. Watch out for underground cables or pipes before digging.
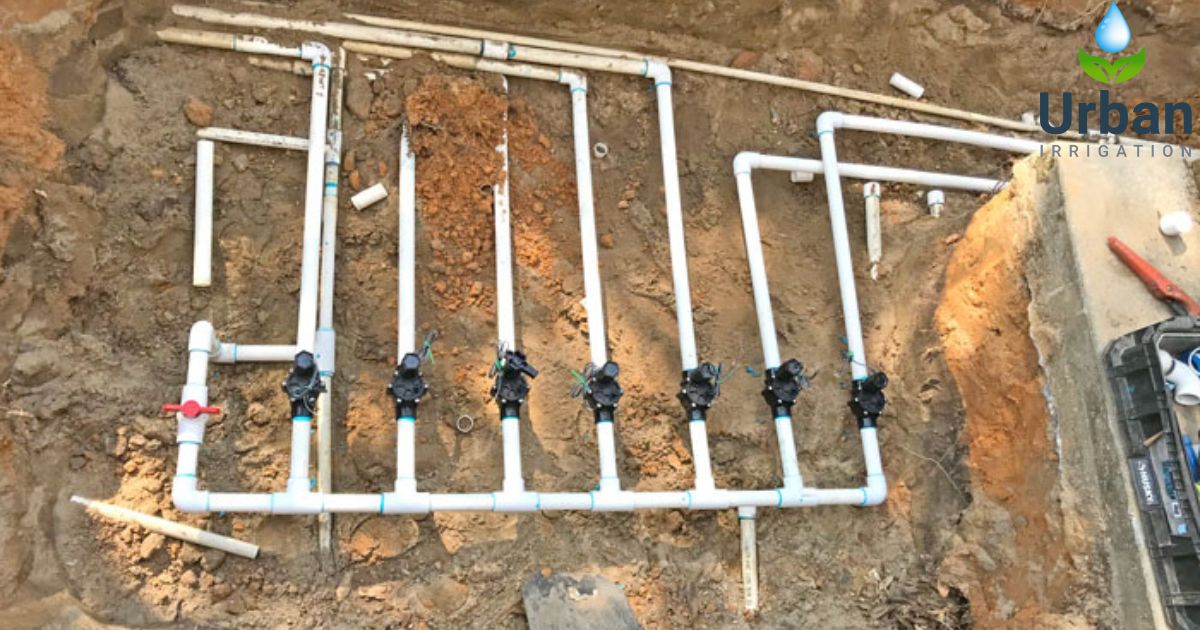
Connecting Components
Joining pipes and valves needs care to avoid leaks. Use proper connectors and sealants. Test each connection by running water through the system. Fix leaks immediately to save water and prevent damage.
Setting The Timer
Programming the irrigation timer can be confusing. Set watering times based on your plants’ needs and local rules. Start with short watering periods and adjust as needed. A timer helps save water and keeps plants healthy.
Frequently Asked Questions
How Difficult Is Diy Irrigation System Installation?
Installing an irrigation system yourself can be challenging but doable. It requires basic tools, planning, and patience. Following step-by-step guides helps reduce errors and saves money.
What Tools Are Needed To Install An Irrigation System?
You need simple tools like a shovel, pipe cutter, and Teflon tape. A timer, connectors, and sprinkler heads are also essential. Having the right tools makes the job easier and faster.
How Long Does It Take To Install An Irrigation System?
Installation time depends on your yard size and system complexity. Small systems may take a few hours; larger ones can take days. Proper planning helps finish the job smoothly and on time.
Conclusion
Installing an irrigation system takes some planning and effort. Basic tools and clear steps make the job easier. Knowing your yard’s needs helps you choose the right system. Small mistakes can cause leaks or poor watering. Taking your time leads to better results.
Many beginners finish with good results after learning. It’s not too hard but requires patience and care. A well-installed system saves water and helps plants grow. Simple guides and videos can assist during the process. This project can be rewarding for any gardener ready to try.
Leave A Comment